It has been more than eight to nine months since you last time cleaned your exhaust fan with light. The light slot had two bulbs. One of them got fused a few days back, whereas the other one has started blinking.
You may have observed that the lid on the top has become misty too. The side railings for exhaust fans also need proper cleaning treatment. So, you have decided to clean it.
But the big problem is how to do it? Don’t worry! We have a solution to all your questions. Just read this article that has been drafted in a way to split the whole procedure into small steps, so nothing is missed!
Why should you bother to clean?
Cleaning is significant in all its means. Just not only because it improves the outlook of your electric devices. But cleaning these machines is part of their maintenance process.
So, record a reminder in your reminder book to clean them every six to nine months. This will improve their working potential.
The impacted dust compels the machine to burn itself more for producing the same amount of output. It counts on your device’s shelf life as well as utility bills.
Exhaust fan holds value for not only providing proper ventilation. It helps in removing the extra moisture from the washroom after you have taken a shower. This moisture, if left behind, can increase the humidity level of your bathroom over a while.
The excellent illumination in the bathroom is essential. Wondering why? Of course, some people only find time in the bathrooms to finish their storybooks!
Let us convert the dusty gray cover to a new sparkling outlook:
The day has come for the operation clean up! Get hold of your ladder as it will help you approach your vent conveniently. Get a brush with broad bristles. This will assist in clearing the dust from reachable areas.
You should have the vacuum cleaner with a long pipe to reach the inner quadrant of the fan installation site. A few towels will help you to give a final clean look to your bathroom.
You need to have two new light bulbs in case you need to replace the old ones. So, are you ready?
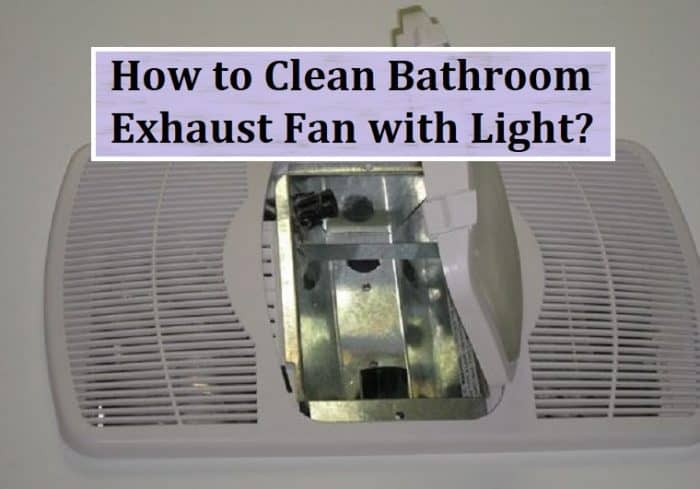
⇒ Remove the outer covers:
Switch off the main power supply. This should be the rule of safety number one. The second is wearing rubber gloves to protect your hands from dust and any other scratches etc.
Now carefully put slight downward and outward lifting pressure on the outer cover. It will come out but is still attached to the primary device body with two clamps. You can quickly release them by holding them in your thumb and finger grip.
Squash them inwards; they will come out as you remove both the clamps. Still, there is one more fixation. It is the plugin wire and is usually a plastic lock. It has a press down release button at the top.
So, while removing it, keep one hand below the cover. This will prevent it from falling as you release the last holding wire.
Once you remove them, place it on a dusting sheet, preferably a wet towel. Clean it’s both inner and outer surfaces first with a brush alone. Then plug in your vacuum cleaner or blower machine.
If you are using a high-power blower machine, it has the advantage that it comes with a set of different nozzles to fix in front of its blower hole. So now clean the surfaces with vacuum and brush.
Once all the dust has been gulped in the void. You can further clean it with a surface cleaner. It will not only wipe away any little debris but will also give an excellent shining look to your outer grills.
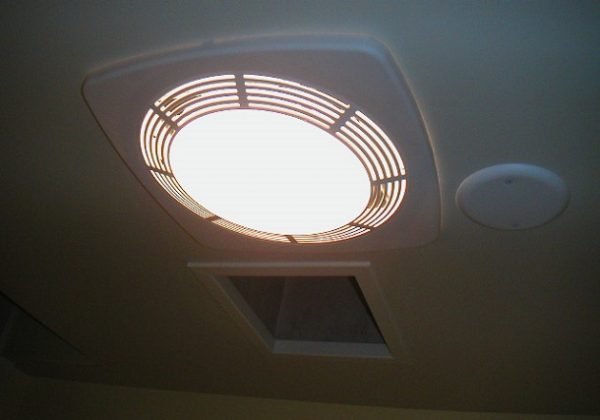
⇒ The light slot is waiting for over-haul:
Now it is the turn of your light slot. Open the lid. Remove the old bulbs. Vacuum and brush will remove away all the dust. Replace them with new ones.
You can check them by switching on the lights. Once you have done this, remember to switch it off before heading on to your vent system.
⇒ The fan body is new again:
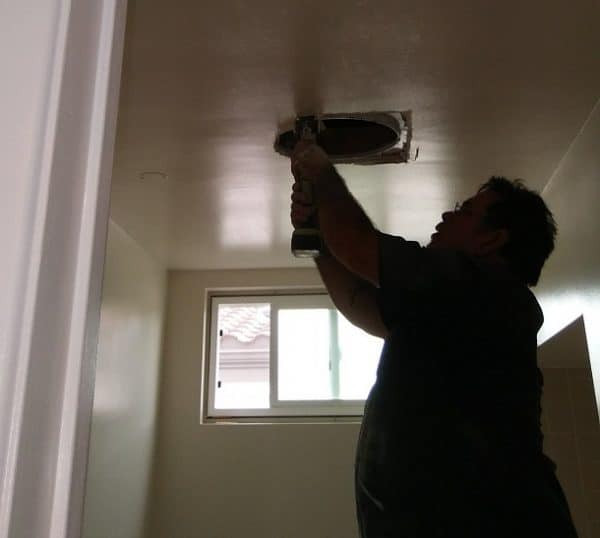
The next step is removing the fan from its screws. Use a screwdriver to help your cause. Always keep a hand under it while eliminating the last holding is removed.
Lest it may not fall once all the clamps are out, clean it thoroughly with the brush and vacuum. Make sure it is cleaned in between its nooks and corners diligently.
The use of a surface cleaner will give better results. Next comes the next step.
⇒ It is not over yet:
Now you have to deal with the outlet system. Put a long nozzle in front of the machine. This will help to move it behind it through the side free slots.
⇒ Let us put the things back in order:
Once the whole system is cleaned correctly. Now comes the point of putting back all the things in order. Put the fan at its place and fix it with the screws.
Once you have done this much, now put the plugin of the wire to its location. Put the side clamps in their place. Now put the cover back. Clean the whole area.
Yes, it is all done. The shine on your vent with light is shining in your eyes, coupled with a sense of achievement!
Cut short message:
Keep it clear in your mind; all the running machines need maintenance and cleaning at regular times. So be it your exhaust with light or any other device, clean them for better results.
The above process is simple. Just requires proper cleaning tool. So, clean it thoroughly. Exhaust fan with light is the two main supplies in the bathroom, whose good running condition ensures a quality time spent in the bathroom.