
Nothing lasts forever, and that includes the caulk of your bathroom sink too. But we guess you don’t have a problem with that. What you’re upset about here is the visual discomfort that broken caulk is causing.
So, what will you do now – call the professionals? Don’t you think this job is too small to call for professional help when you can do it by yourself? All you need to do is just know how to caulk a bathroom sink.
Wait a minute! Before you think it’s a hard nut to crack, let us tell you that you can do this just by following a few steps, and that’s what we’re about to bring to your table.
Caulking a Bathroom Sink: Step by Step
We don’t know if you’ve noticed something or not, but almost each and every single thing we do is followed by certain steps. But why’s that? Well, that’s because following steps is what makes the execution simpler and easier.
The same thing goes for caulking the bathroom sink, and you can pull the job off just by completing the following steps:
Step – 1: Getting All the Required Tools for the Job
Clearly, you’re going to need a few things to get your sink caulked. So, bring those tools in first. Thankfully, you’ll get most of them in the house. The list includes cloth, silicone sealant, mastic gun, small bowl, metallic scraper.
Step – 2: Clean Up the Area
As you’re trying to work around a sink, the area being wet is nothing unusual. Take a piece of dry cloth and wipe it all clean. Make sure that you’ve got nothing like soap residue anywhere over or close to the sink.
Step – 3: Scrape Off the Previous Sealing
No matter how good sealant you’re planning to use, it won’t be of much use if you don’t get rid of the previous sealing. If they’ve already started to break off, then it shouldn’t be a problem.
Take the metallic scrapper and start scraping the edge to remove the existing sealant. But make sure you’re not scratching the sink in the process, and try to do the same for the countertop as well.
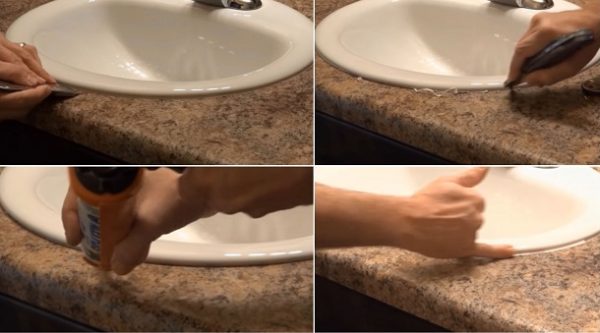
Step – 4: Cleaning Up the Mess
Right after that, take that small bowl, pour some soapy water in it, soak a cloth in the water and clean up the mess with that. Once you’re done there, let the area get dry so that it can be ready for the new sealant application.
Step – 5: Apply the Sealant
Before you go for the final application, make sure that you’ve cut the sealant tube opening according to the width of the gap between the countertop and the sink. Otherwise, you might shed extra sealant, which will be nothing but a waste.
By the way, in case the sink is feeling a bit shaky, don’t forget to put the plumber’s putty under the edges of the sink before using the sealant. That’s because a shaky sink can spoil the caulking, no matter how good sealant you’re using there.
Now, to ensure the proper application in a more efficient way put the sealant tube in your mastic gun. Then set the tube on the end of the starting point of the gap and pull the trigger to make the silicone come out.
Slowly apply the silicone over the entire gap. Make sure the gap is getting a sufficient amount of sealant that you can give the finishing touch over later. If there’s a wall attached to the sink, the gap might be a little bigger. So, ensure putting extra silicone in there if necessary.
Step – 6: Smoothing Up the Sealant
Now get ready to smooth it all up. But for that, you’re going to need a solution made of washing-up liquid and water. Make sure the proportion of the elements is 50/50.
Now what you need to do next is dip a finger of yours in that solution and run over the silicone bead. But don’t put pressure over it as that might push the sealant too deep and create an unwanted gap. Keep running the finger over it gently till you reach the end. You can also use a lint-free rag to do that if you want.
Then check out the smoothness and if you see any edge with uneven sealant, run your finger over it again. That’s how the professionals do it.
Step – 7: Recheck the Sealant
It’s not impossible for you to miss a spot or two to seal properly even after applying the silicone. Well, if the applied silicone has reached too deep and is not sufficient for the entire crack, then there’s a chance of seeing a new gap after getting done with the whole process.
If you see anything like that, reapply a little silicone on those gaps to make sure that you’ve perfected the caulk.
Frequently Asked Questions
Should I caulk around bathroom sink?
Well, that answer is depending on the current condition of the sealing. If you’re seeing it has a small crack, then scraping off the entire sealing will be nothing but a waste of energy and sealant. That doesn’t mean you can’t put a little silicone in there and smooth it up to cover the crack.
But things are a bit different when you’ve got messy cracks all over the sink’s edges. If the number of cracks is too much, try scraping off the whole sealing and put a new one there. We’ve already told you the process. So, doing it won’t be a problem for you we guess.
Why does my caulk keep cracking?
Having cracked caulk is nothing unusual in the bathroom sink as, after a certain period of time, it just starts losing its grip. But we can’t say the same thing when you’re facing this problem more frequently than ever.
Basically, there are three reasons we’ve found so far that can cause you this problem.
The first one is using the wrong caulk. Not all caulks are made to work on all kinds of surfaces. As in the bathroom, the sink comes in touch with water more often; you need something that sustains the torture of the water on a regular basis. But the wrong one can’t handle that.
Now comes the second reason, inadequacy in surface preparation. Before you seal the deal, you need to get the surface prepared in a proper way. But if you skip that part somehow, you might end up in cracked caulk more frequently than you think.
Having a shaky sink is the third reason for causing frequent caulk cracking. As you see, caulk is about filling up the gap between the surface and the sink. But when it starts moving, the sealing fails to remain static and starts cracking.
How do you seal a bathroom sink to the countertop?
The sealing works in two different ways. If you want to give the sink more stability through the sealing, then you better use the plumber’s putty at the joining point of the sink and surface. But if it’s about filling the gap on the edge of the sink, then using silicone sealant will be enough to pull that off.
Final Words
So, what do you say? Will you still go for professional help or will you seriously think about going DIY? We hope you’re finally thinking about the second option as now you know how to caulk a bathroom sink.