
It is normal for a shower faucet to get rusty or bad over time, that is when you will have to get them replaced. However, you could opt for changing them out on your own.
Now, it is very important for you to follow certain steps in order to change out the shower faucet. If you do end up making mistakes while changing up the faucet, then there is a chance of leaking or even breakage.
So, to help you out, here we’ll teach you how to change shower faucet?
Here’s How to Change Shower Faucet?
You have to follow a process to get the job done, and we will give you a detailed narration of how you must complete each of the steps.
Step 1: Close the Drain
The first thing you have to do before you can move to the actual work is to block or close out the drain. You can use an old rag if you want to close it, or if you have a lid for the drain, then that will do the job as well. Whichever you choose to use, just make sure it is done so tightly.
It is important for you to close the drain as when you will start unscrewing the faucet, many of the pieces might end up rolling down the drain. There is no way for you to retrieve it from the drainage system. You will have to get new parts and pieces to finish the job.
Step 2: Take off the Handles of the Shower
The next thing you must do is to take the shower handles off. These handles are used to control the flow of the water coming out of the faucet and are attached to the wall. So, you will have to use a screwdriver to unscrew the screw and then to ease the handle off the stem.
However, at times, you will see that the handle does not want to come off, don’t be worried. This usually happens because they have been stuck there for a long time, just wiggle it a little and pull it harder. That should do the job.Also, just remember to keep all the screws and the handle in the same place so that you don’t end up losing a few of them.
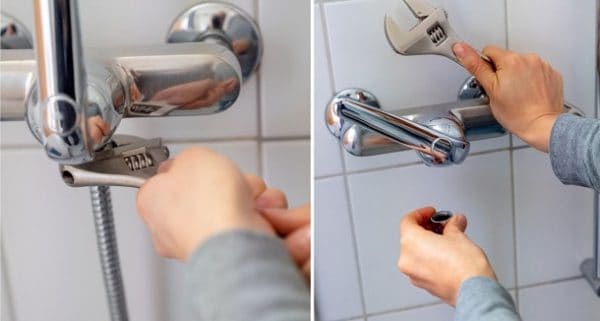
Step 3: Take the Trim Plate off
After the handles, you have to tackle the trim plate, which is also referred to as Escutcheon plate. Same as the handle, they are attached to the wall using screws which you will have to take out in order to get the trim plate off the wall. This should not be a difficult task.
When you have it out, place it where you kept the handle, so you don’t lose it. You can even dip them in some vinegar and water solution while you work on the faucet to make it look new and clean again.
Step 4: Get Rid of Caulk on the Trim Plate
Sometimes you will see the trim plate is not only secured to the wall using screws, caulk is also used to keep it tightly fixed in place. In case it is, you will have to remove them from the plate before you proceed further.
However, this is not something you will have to worry about if no caulk is applied to your trim plate. All you have to do is; take a knife and scrape it off gently. Don’t be too harsh, as otherwise, you might end up leaving scratches on the plate.
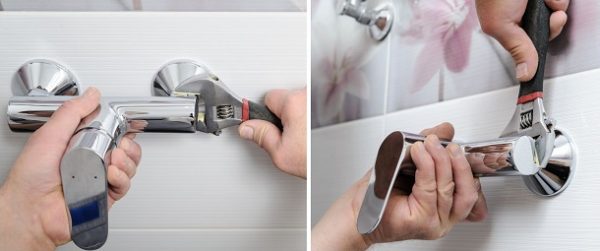
Step 5: Shut the Water Supply
Before you open up the faucet, you should turn off your water supply. This is a step you could skip if you want to, but chances are you’ll have to deal with leakage. So you should try and find the water supply and turn it off.
At times the water supply is controlled using screws; in that case, you need to screw it shut. Also, if you can’t find the screw, you could turn off the water supply for the whole house. It might be a bit inconvenient if there are others in the house.
Step 6: An Access Has to Be Cut to Reach the Valve
Once you remove the trim plate, you should not have access to the valve. But in some cases, the opening might not be wide enough for you to reach inside. In that case, a hole has to be cut. Now, how you make the opening depends on what material is used to make the wall.
Keep in mind that the hole should not be so big that you will have a problem covering it up with the trim plate and the handle. If you think you cannot do it by yourself, then you can hire someone to do it for you. That way, you can be sure it will be done properly.
Step 7: Use Needle Nose Plier to Remove Valve Clip
In order to hold the valve into place, there is a small clip at the very top. You will have to remove this to proceed further. Use a plier with a very small nose to get it out. You will not be able to reach it with anything too big.
Keep it aside if the clip is good. And if it is damaged, then there is no real need to keep it as your new set should have a clip with it.
Step 8: Pull the Valve Out
Just as you pulled the clip out of the valve using a needle nose plier, you will have to do the same to pull the whole valve out too. You will not be able to reach it with a bigger plier. If it is lodged too tight to the wall, then you might have to pull harder or try wiggling it out.
To make it easier to slip the valve out, you could spray some type of lubricant, that will help slid it out with no resistance. Now what you decide to do with the valve is completely up to you. You could choose to reuse it or throw it away.
Step 9: Put the New Valve in
Just the way you took the old one out, now you have to insert the new valve into place. Hold the cartridge of the valve with a plier and slowly ease it in place of the old one.
If you feel some kind of resistance while pushing the valve, then you might need to use the wiggling technique again. That should do the trick just fine.
Something you must keep in mind is the size of the valve you buy. It has to be of the same size. So, before you make the purchase, be sure to check the size. A size too big or too small will not do the job.
Step 10: Place the Clip Back
By this point, you can see we are putting everything into place. So now you have to put the clip back to the same place you took it out of before. You could use the new one that came with the valve, or you could even go for the old one you put aside.
Step 11: Turn the Water Supply Back on
If you turned off the main water supply, then you can turn that back on. But if you were able to find the supply line for the faucet you are fixing, loosen up the screw so that water can easy flow back.
Step 12: Put the Trim Plate and Handle Back into Place
You have reached the very end of the whole process. At first, place the trim plate where it was and secure it using screws. Then, it is time for you to place the handle and attach it to the wall.
Once that is done, your work is complete. You have successfully changed the faucet without encountering any problems.
Now you can just remove the rag or the lid from the drain, and you are good to go.
Frequently Asked Question (FAQs)
Can you replace a shower faucet without replacing the valve?
Yes, you can always replace it without replacing the valves. Usually, they are held to the valve stem by one screw!
That is to mean that the only things that you will need to change are the handle as well as the screw that holds it. It is not necessary to change the valve.
You will, however, have to change the valve if it is damaged. The good news is that it is not expensive to replace both the valve and the stem as well!
How do you remove a shower faucet cartridge?
The product is always inside the faucet. Accessing it without opening up the entire head might prove to be impossible. To remove it, therefore, you will have to unscrew the handle, dismantle it, albeit with a lot of care and remove it.
The cartridge is also delicate since it has the controls for the shower system. Be careful when handling it!
Should I caulk around the shower faucet?
Calking helps a great deal in preventing water from damaging the faucet. I would always advise you to do so. It is an inexpensive process that you should undertake every time!
Shower faucets that do not have caulk do not last long!
Conclusion
Soon as you go over all the steps in the order they are given to you here; you will not face any problem in completing the job. However, if you are confused then you can ask for help from someone who has done this before.